Determines size, shape, position, and movement of the internal organs.
Body habitus
The thoracic cavity contains:
- Lungs
- Heart
- Organs of the Respiratory system
- Organs of the Cardiovascular system
- Organs of the Lymphatic system
- Inferior portion of the esophagus
- Thymus gland
Three separate chambers of the thoracic cavity.
- Pericardial cavity
- Right Pleural cavity
- Left Pleural cavity
Lines the right, left, and pericardial cavities.
Serous membranes
Space between the two pleural cavities.
Mediastinum
Separates the thoracic cavity from the abdominal cavity.
Diaphragm
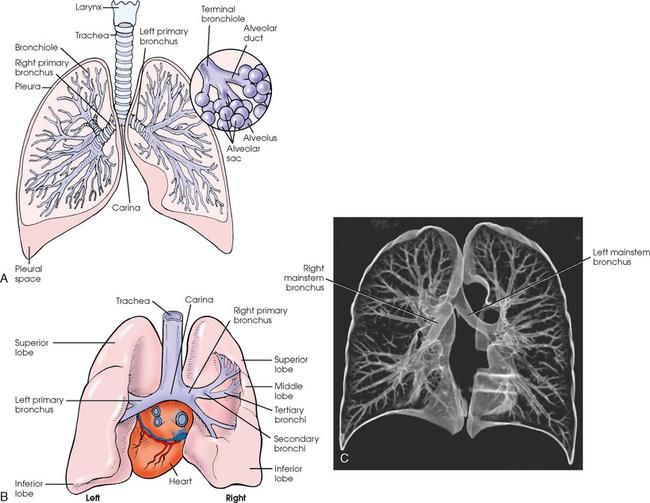
The Respiratory system consists of:
- Trachea
- Bronchi
- Lungs
Fibrous muscular tube with 16-20 C-shaped cartilaginous rings embedded in its walls for greater rigidity.
Trachea
Two lesser tubes the trachea divides into.
Primary bronchi
The shorter, wider, and more vertical of the two primary bronchi.
Right primary bronchus
After entering the lungs, the primary bronchi divides, sending branches to each lobe of the lung. These are called __________.
Secondary bronchi
Secondary bronchi further divides into __________.
Tertiary bronchi
Tertiary bronchi divide further into __________.
Bronchioles
Length and diameter of the trachea.
- 4 1/2 inches in length
- 1/2 inch in diameter
The last tracheal cartilage is elongated and has a hook-like process, which extends posteriorly on its inferior surface. This hook-like process is called __________.
Carina
Walls of the Alveolar sacs are lined with __________. (Respiratory sacs)
Alveoli
Light, spongy, highly elastic substance the lungs are composed of.
Parenchyma
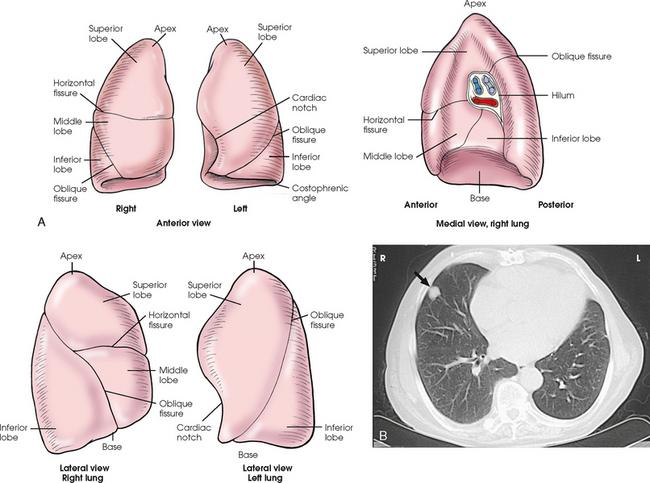
Each lung presents a rounded __________ that reaches above the level of the clavicles into the root of the neck.
Apex
The lungs also present a broad __________ that rests on the obliquely placed diaphragm and reaches lower in the back and at the sides than it does in the front. (Inferior part of the lung)
Base
Reasons the right lung is about 1 inch shorter and broader than the left lung.
- Shorter because of the large space occupied by the liver
- Broader because of the position of the heart
Respiration in which the lungs move inferiorly / Diaphragm moves down.
Inspiration
Respiration in which the lungs move superiorly / Diaphragm moves up.
Expiration
During which respiration do the lateral margins descend into the deep recesses of the parietal pleura?
Inspiration
Deep recesses of the parietal pleura.
Costophrenic Angles
The mediastinal surface is concave with a depression called the __________.
Hilum
The hilum accommodates:
- Bronchi
- Pulmonary blood vessels
- Lymph vessels
- Nerves
The inferior mediastinal surface of the left lung contains a concavity called the __________.
Cardiac notch
The cardiac notch conforms to the shape of the __________.
(A mediastinal organ)
Heart
The double walled, serous membrane sac that encloses each lung.
Pleura
Inner layer of the pleural sac which closely adheres to the surface of the lung, extends into the interlobar fissures, and is contiguous with the outer layer of the hilum.
Visceral Pleura
The outer layer of the pleural sac which lines the wall of the thoracic cavity occupied by the lung and closely adheres to the upper surface of the diaphragm.
Parietal Pleura
Space between two pleural walls.
Pleural cavity
Each lung is divided into __________ by deep fissures. (Major sections of the lungs)
Lobes
The area of the thorax bounded by the sternum anteriorly, the spine posteriorly, and the lungs laterally. (Area between the lungs)
Mediastinum
Structures associated with the mediastinum.
- Heart
- Great vessels
- Trachea
- Esophagus
- Thymus
- Lymphatics
- Nerves
- Fibrous tissue
- Fat
A narrow, musculomembranous tube that is part of the digestive canal that connects the pharynx with the stomach.
Esophagus
Length of the esophagus.
9 inches
Used almost exclusively to image the anatomic areas of the thorax including the thymus gland.
Computed Tomography (CT)
Destructive and obstructive airway changes leading to an increased volume of air in the lungs. Lungs will be dark
Emphysema
Collection of fluid in the pleural cavity. Fluid in the lungs will be white.
Pleural Effusion
Acute infection of the lung parenchyma.
Pneumonia
Accumulation of gas or air in the pleural cavity resulting in collapse of the lung.
Pneumothorax
Position in which gravitational force causes the abdominal viscera and diaphragm to move superiorly; it compresses the thoracic viscera, which prevents full expansion of the lungs.
Recumbent
Position most commonly employed for radiography of the heart and lungs because it places the heart closer to the IR resulting in a less magnified heart image.
Left Lateral chest position
Projection in which the patient rotates the hips with the thorax and points the feet directly forward. The shoulders should lie in the same transverse plane on all radiographs.
Oblique
During this respiration, the costal muscles pull the anterior ribs superiorly and laterally, the shoulders rise, and the thorax expands from the front to the back and from side to side.
Normal Inspiration
This respiration causes the diaphragm to move inferiorly, resulting in elongation of the heart.
Deep inspiration
Radiographs of the heart should be obtained at the end of __________ to prevent distortion.
Normal inspiration
The respiration that best shows Pneumothorax because collapse of the lung is accentuated.
Expiration
Most common projection of the chest and is used in all lung and heart examinations.
PA projection
Minimum SID for PA projection of the chest.
72"
When preparing to radiograph the trachea (Soft tissue neck) for the AP projection, always use a _________.
Grid
IR size and placement used for the trachea.
- 10X12 inch (24X30 cm)
- Lengthwise
Position patient is examined in for AP projection of the trachea.
Supine/Upright
Position of the central ray in AP projection of the trachea.
Perpendicular through the manubrium to the center of the IR
How many lobes does the right lung have?
3
- Superior lobe
- Middle lobe
- Inferior lobe
How many lobes does the left lung have?
2
- Superior lobe
- Inferior lobe
Separates the superior lobe from the middle lobe of the right lung.
Horizontal fissure
Separates the middle lobe from the inferior lobe.
Right oblique fissure
Separates the Superior and inferior lobes of the left lung.
Left oblique fissure
Label:
- Superior lobes
- Middle lobe
- Inferior lobes
- Primary Bronchi
- Tertiary Bronchi
- Carina
- Terminal bronchiole
- Pleural space
- Alveoli
- Pleura
- Trachea
- Larynx
Label:
- Horizontal fissure
- Oblique fissure
- Costophrenic angles
- Base
- Apex
- Cardiac notch
- Hilum
Reasons a patient will be placed in the upright position, whenever possible, for radiography of the heart and lungs.
- Prevent engorgement of the pulmonary vessels
- Allow gravity to depress the diaphragm to its lowest position
- Show air-fluid levels
Inspiration and Expiration radiographs are also used to show __________, __________, and __________.
- Movement of diaphragm
- Presence of a foreign body
- Atelectasis (Absence of air)
Instances in which you would use a grid.
- Thicker parts of the body
- Produce images with higher contrast
- Recommended for opaque areas within the lung field
Reasons a minimum SID of 72" is used whenever possible for PA projections of the heart and lungs.
- Minimize magnification of the heart
- Obtain greater recorded detail (Spatial resolution) of the delicate lung structures
Reason you would use a grid for AP projection of the trachea.
- Minimize scatter radiation because the kVp must be high enough to penetrate the sternum and cervical vertebrae
Structures that should be clearly shown in final image of the AP projection of the trachea.
- Area from the midcervical to midthoracic region
- Air-filled trachea
- No rotation
Process of positioning for AP projection of the trachea.
- Center midsagittal plane of the body to the midline of the grid
- Adjust shoulders to lie in the same transverse plane
- Extend neck slightly and adjust so midsagittal plane is perpendicular to the plane of the IR
- Collimate closely to the neck
- Shield gonads
- Respiration: Slow inspiration to ensure trachea is filled with air
Where does the trachea lie?
In coronal plane that passes approximately midway between to jugular notch and the midcoronal plane
Position of central ray in Lateral projections of the trachea.
- Horizontal through a point midway between the jugular notch and the midcoronal plane
- Through a point 4-5 inches lower to show the superior mediastinum
Structures that should be clearly shown in images in Lateral projections of the trachea.
- Area from the midcervical to the midthoracic region
- Trachea and superior mediastinum free of superimposition by the shoulders
- Air-filled trachea
- No rotation
IR size and placement used for PA projection of the lungs and heart.
- 14X17 inch (35X43 cm)
- Lengthwise
Placement of IR for PA projections of the heart and lungs in hypersthenic patients.
Crosswise
Minimum SID for Lateral projections of the heart and lungs.
72"
Reasons for having a minimum SID of 72" for Lateral projections of the heart and lungs.
- Decrease magnification of the heart
- Increase recorded detail of the thoracic structures
IR size and placement for Lateral projections of the lungs and heart.
- 14X17 inch (35X43 cm)
- Lengthwise
Placement of central ray for Lateral projections of the lungs and heart.
- Perpendicular to the center of the IR
- Central ray enters patient on the midcoronal plane at the level of T7 or at the inferior aspect of the scapula
Should be clearly shown in final image of Lateral projection of the lungs and heart. (Evaluation criteria that should be met)
- Evidence of proper collimation
- Arm or its soft tissues not overlapping the superior lung field
- Costophrenic angles and lower apices of the lungs
- Hilum in approximate center of the radiograph
- Superimposition of the ribs posterior to the vertebral column
- Lateral sternum with no rotation
- Long axis of the lung fields shown in vertical position, without forward or backward leaning
- Open thoracic intervertebral spaces and intervertebral foramina (Except with patients with scoliosis)
- Penetration of the lung fields and heart
- Sharp outlines of the heart and diaphragm
IR size and placement for PA oblique projections of the lungs and heart.
- 14X17 inch (35X43 cm)
- Lengthwise
Minimum SID for PA oblique projections of the heart and lungs.
72"
Position of patient in PA oblique projection of the heart and lungs.
- Upright
- Let arms hang free
- Turn approximately 45 degrees toward left side for LAO and approximately 45 degrees toward right side for RAO
- Stand or sit straight
- The side of interest is the side farther away from the IR
In PA oblique projections of the heart and lungs, the top of the IR should be placed about __________ above the vertebral prominens because the top of the shoulders may not be on the same plane.
1.5 to 2 inches
Position of part for PA oblique projection, LAO position.
- Rotate patient 45 degrees to place left shoulder in contact with grid, and center thorax to the IR. Ensure that right and left sides of body are positioned to the IR
- Place left hand on the hip with palm outward
- Raise right arm to shoulder level and grasp top of vertical grid device for support
- Adjust shoulders to lie in the same horizontal plane and do not rotate the head
- Respiration: Full inspiration
__________ degree oblique position is used in PA oblique projection, LAO position for a cardiac series.
55 to 60
Position of part for PA oblique projection, RAO position.
- Rotate patient 45 degrees to place the right shoulder in contact with the grid, and center thorax to the IR
- Place right hand on the hip with palm outward
- Raise left arm to shoulder level
- Adjust shoulders to lie in the same horizontal plane and do not rotate head
- Respiration: Full inspiration
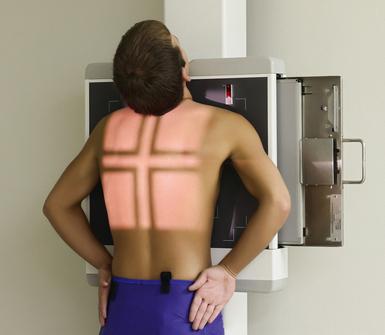
This is a __________projection of the __________.
- PA projection
- Chest
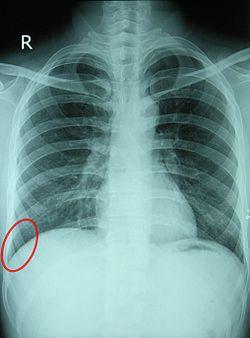
What is circled in this x-ray? (PA projection of chest)
Costophrenic angles
Structures shown on final image of proper LAO position.
- Maximum area of the right lung field
- Thoracic viscera
Structures shown on final image of proper RAO position.
- Maximum area of the left lung field
- Thoracic viscera
PA oblique projection positions used routinely during cardiac studies with barium.
RAO and LAO
Should be shown clearly in PA oblique projections. (Evaluation criteria that should be met)
- Evidence of proper collimation
- Both lungs in their entirety
- Trachea filled with air
- Visible identification markers
- Heart and mediastinal structures within the lung field of the elevated side in oblique images of 45 degrees
- Maximum area of the right lung in LAO
- Maximum area of the left lung in RAO
IR size, placement, and minimum SID for AP oblique projections of the lungs and heart.
- 14X17 inch (35X43 cm)
- Lengthwise
- 72"
Position of patient in AP oblique projections of heart and lungs.
- Patient will be supine or facing the x-ray tube
- Either upright or recumbent
With positioning a patient in AP oblique projections of the heart and lungs, the IR will be adjusted so that the upper border is about __________ OR __________.
- 1.5 - 2 inches above the vertebral prominens
- About 5 inches above the jugular notch
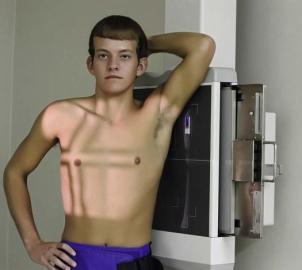
What projection and position is portrayed in this image?
Upright AP oblique chest, LPO position.
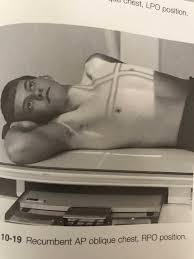
What projection and position is portrayed in this image?
Recumbent AP oblique chest, RPO position.
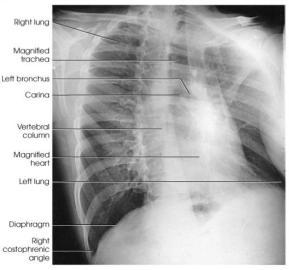
X-ray of AP oblique chest, LPO position.
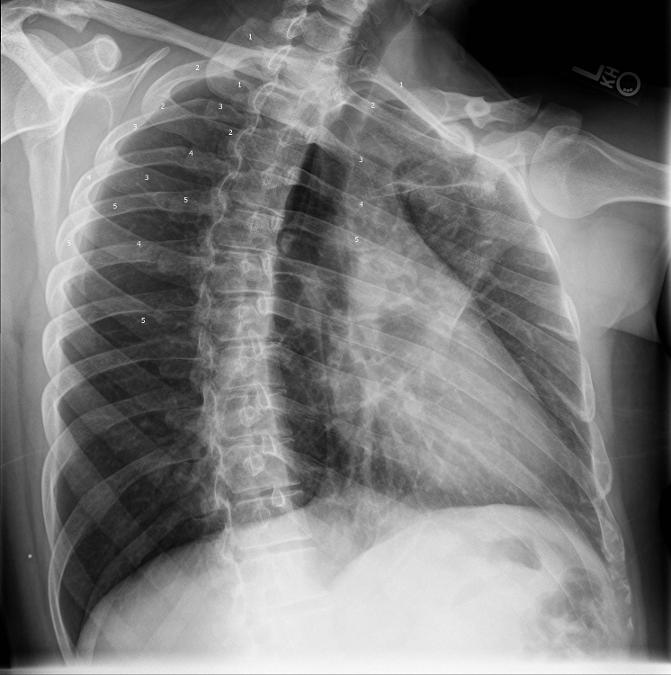
X-ray of PA oblique chest, RAO position at 45 degrees.

What projection and position is portrayed in this image?
PA oblique chest, LAO position.
Position of part for AP oblique projection of lungs and heart.
- Rotate patient toward the correct side, adjust body at 45 degrees, and center thorax to the grid
- If patient is in recumbent position, support the elevated hip and arm. Ensure that both sides of the chest are positioned to the IR
- Flex elbows and place hands on hips with palms facing outward, or pronate the hands beside the hips
- Adjust shoulders to lie in the same transverse plane in a position of forward rotation
- Respiration: Full inspiration
Position of central ray for AP oblique projections of heart and lungs.
Perpendicular to the center of the IR at a level of 3 inches below the jugular notch
Should be clearly shown in AP oblique projections to ensure that the final image is correct. (Evaluation criteria that should be met)
- Evidence of proper collimation
- Both lungs in their entirety
- Trachea filled with air
- Visible identification markers
- Lung fields and mediastinal structures
- Maximum area of left lung for LPO
- Maximum area of right lung for RPO
Position of part for AP projections of the chest.
- Center midsagittal plane of the chest to the IR
- Adjust IR so that the upper border is approximately 1.5 - 2 inches above the relaxed shoulders
- Flex elbows, pronate hands, and place hands on hips to draw the scapulae laterally
- Respiration: Full inspiration
Position of the central ray for AP projections of the chest.
- Perpendicular to the long axis of the sternum and the center of the IR
Where should the central ray enter the body for AP projections of the chest?
Approximately 3 inches below the jugular notch
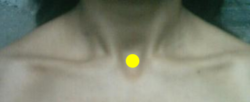
Indicated by the yellow dot.
Jugular notch
Should be clearly shown in the final image of AP projections of the chest (Evaluation criteria that should be met)
- Evidence of proper collimation
- Entire lung fields from the apices to the costophrenic angles
- No rotation
- Clavicles lying more horizontally and obscuring more of the apices than in the PA projection
- Faint image of the ribs and thoracic vertebrae visible through the heart shadow
- Pleural vascular markings visible from the hilar regions to the periphery of the lungs
IR size, placement, and minimum SID for AP axial projection Lindblom Method Lordotic position.
- 14X17 inch
- Lengthwise
- 72"
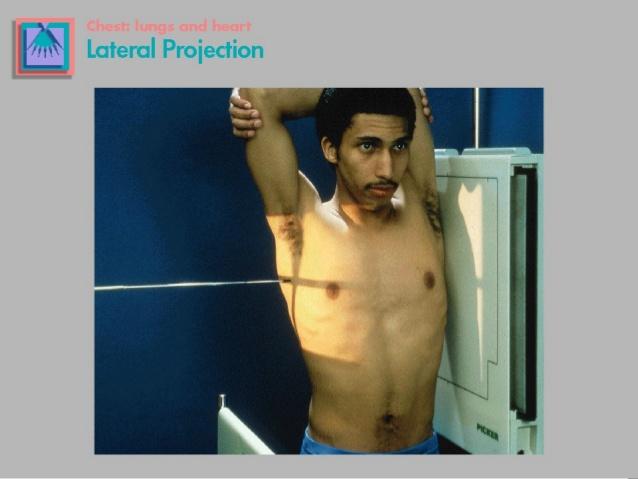
Lateral chest
Proper inspiration in PA projection of the chest can be demonstrated by __________ visible above the diaphragm.
10 ribs
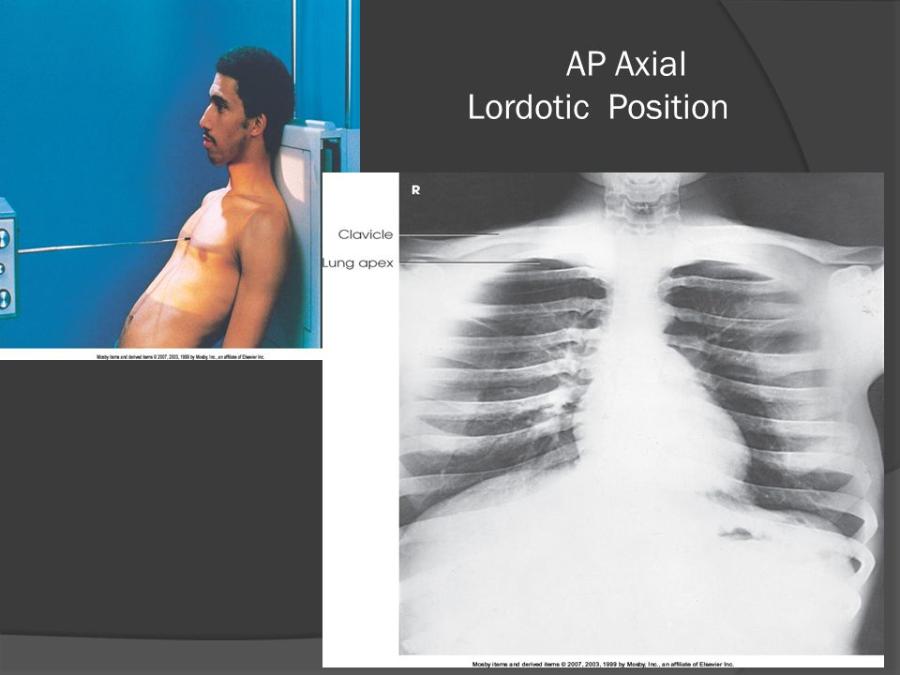
Position of patient in AP Axial projection Lordotic position.
Stand patient in upright position facing the x-ray tube approximately 1 foot in front of the vertical grid device
In AP Axial projection Lordotic position, adjust height of the IR so that the upper margin is about __________above the upper border of the shoulders.
3 inches
AP Axial projection Lordotic position.
AP Axial projection of the heart and lungs.
Position of part in AP Axial projection Lordotic position.
- Adjust patient with the coronal plane of the thorax 15 - 20 degrees from the vertical and midsagittal plane centered to the midline of the grid
Position of the central ray for AP Axial projection Lordotic position.
Perpendicular to the center of the IR at the level of the midsternum
Position of part for AP Axial projection Oblique Lordotic positions - LPO or RPO.
- Rotate patient's body approximately 30 degrees away from the position used for AP projection, with affected side toward and centered to the grid
- Have patient flex elbows and place hands, palms out, on the hips
- Have patient lean backward in a position of extreme lordosis and rest the shoulders against the vertical grid device
- Shield gonads
- Respiration: Full inspiration
Should be shown clearly in AP Axial projection, Lordotic position. (Evaluation criteria that should be met)
- Evidence of proper collimation
- Entire apices and appropriate portion of the lungs
- Clavicles located superior to the apices
- Sternal ends of the clavicles equidistant from the vertebral column
- Clavicles lying horizontally with their sternal ends overlapping only the first or second ribs
- Ribs distorted with their anterior and posterior portions superimposed
A patient is recumbent facing the image receptor. The right side of the body is turned a 15 degrees toward the image receptor. What is this position?
Right Anterior Oblique (RAO)
A patient is erect with the back to the image receptor. The left side of the body is turned 45 degrees toward the image receptor. What is this position?
Left Posterior Oblique (LPO)
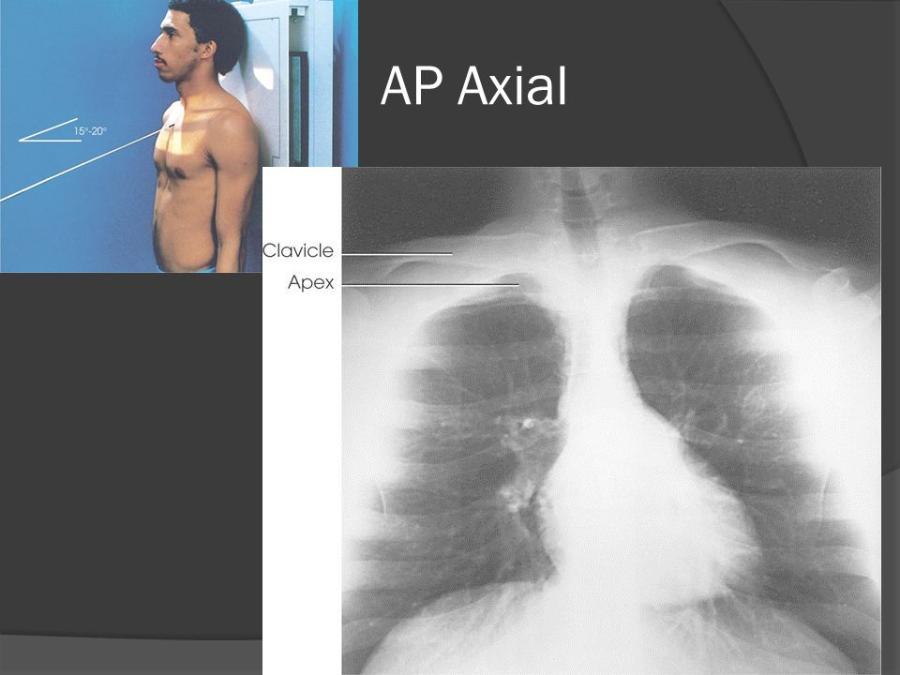
IR size, placement, and minimum SID for AP Axial projection.
- 10X12 inch or 11X14 inch
- Crosswise
- 72"
Position of part for AP Axial projection.
- Center IR to midsagittal plane at the level of T2 and adjust the patient's body so that it is not rotated
- Flex elbows and place hands on hips with palms out or pronate hands beside the hips
- Place shoulders back against the grid and adjust them to lie in the same transverse plane
- Respiration: Expose at the end of full Inspiration
Position of the central ray for AP Axial projection.
- Directed at an angle of 15 or 20 degrees cephalad to the center of the IR and entering the manubrium
Should be clearly shown in AP Axial projection.
- Apices in their entirety (Lying below the clavicle)
- Superior lung region adjacent to the apices
- Clavicles located superior to the apices
- Sternal ends of the clavicles equidistant from the vertebral column
- Clavicles lying horizontally with their sternal ends overlapping only the first or second rib
- Ribs distorted, with their anterior and posterior portions superimposed
IR size and placement for AP or PA projection in right or left decubitus position.
- 14X17 inch
- Lengthwise
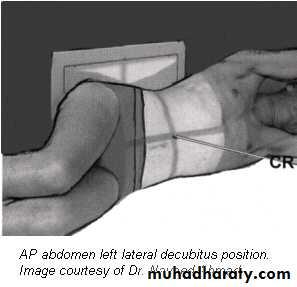
What x-ray is being taken in the picture?
AP left lateral decubitus
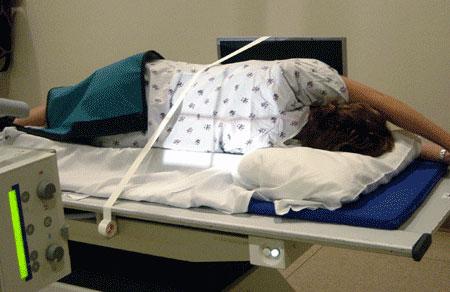
What x-ray is being taken in this picture?
PA right lateral decubitus
Position of central ray for AP/PA right or left lateral decubitus positions.
- Horizontal and perpendicular to the center of the IR at the level 3 inches below the jugular notch for AP projection
- Horizontal and perpendicular to the center of the IR at the level of T7 for PA projection
AP/PA projections obtained using the lateral decubitus position show __________ and __________
- Change in fluid position
- Reveals any previously obscured pulmonary areas or presence of free air
Should be clearly shown in AP/PA projection, lateral decubitus (Evaluation criteria that should be met)
- Evidence of proper collimation
- Affected side in its entirety, from apex to costophrenic angles
- No rotation from true frontal position
- Patient's arms not visible in the field of interest
- Proper identification visible to indicate that the decubitus position was performed
IR size and placement for Lateral projection, Ventral/Dorsal decubitus.
- 14X17 inch
- Lengthwise
Position of patient for Lateral projection, ventral/dorsal decubitus.
- Prone or supine, elevate thorax 2-3 inches, centering thorax to the grid
- Remain in this position for 5 minutes before exposure to ensure the best visualization (Allows fluid to settle and air to rise)
Position of part for Lateral ventral/dorsal decubitus.
- Adjust body to true prone or supine position, extend arms well above the head
- Place affected side against the vertical grid device and adjust so that the top of the IR extends to the level of thyroid cartilage
- Respiration: full inspiration
Position of central ray for lateral ventral/dorsal decubitus.
Horizontal and centered to the IR.
Central ray enters at the level of midcoronal plane and 3-4 inches below the jugular notch for the dorsal decubitus.
Central ray enters at the level of midcoronal plane and at the level of T7 for ventral decubitus
Must be clearly shown in Lateral ventral/dorsal decubitus (Evaluation criteria that must be met)
- Evidence of proper collimation
- Entire lung fields
- Upper lung field not obscured by the arms
- Not rotation of the thorax from true lateral position
- T7 in the center
- Proper marker identification visible to indicate that the decubitus position was performed