___ wounds resulting from surgery or trauma without underlying defects heal rapidly, within 4 to 6 weeks, though this time may vary. Healing follows a predictable process, and with proper management, complications are rare.
Acute
- Restores skin barrier and initiates visible healing; usually occurs within 2 to 3 days post-surgery with primary closure.
Epithelial Resurfacing
- Collagen deposition occurs between days 4 and 21 post-op, providing tensile strength and structural integrity to healing tissue.
Collagen Deposition
Factors Affecting the Healing Journey
Indirect
Indirect factors include:
- Length of hospital stay
- Healthcare professionals' compliance with standards
- Environmental factors like access to food, clean air, and healthcare
Factors Affecting the Healing Journey
Direct
Direct factors that can influence healing are:
Preparation of skin- Proper cleansing and surgical site preparation are essential.
Aseptic technique- Maintaining sterile conditions during and after surgery minimizes infection risks.
Surgical considerations
Diabetes management- Blood glucose levels should be kept below 200 mg/dL.
Oxygen and perfusion
Medical conditions- Comorbidities (e.g., cardiovascular disease, cancer, obesity) slow healing by limiting energy and nutrient delivery
Medications- Steroids and NSAIDs impair healing, especially in inflammation and tissue remodeling phases.
Nutrition- Adequate calories, protein, and nutrients (e.g., vitamins A, C, E) are essential for tissue repair.
Psychological health- Stress, depression, and anxiety slow healing
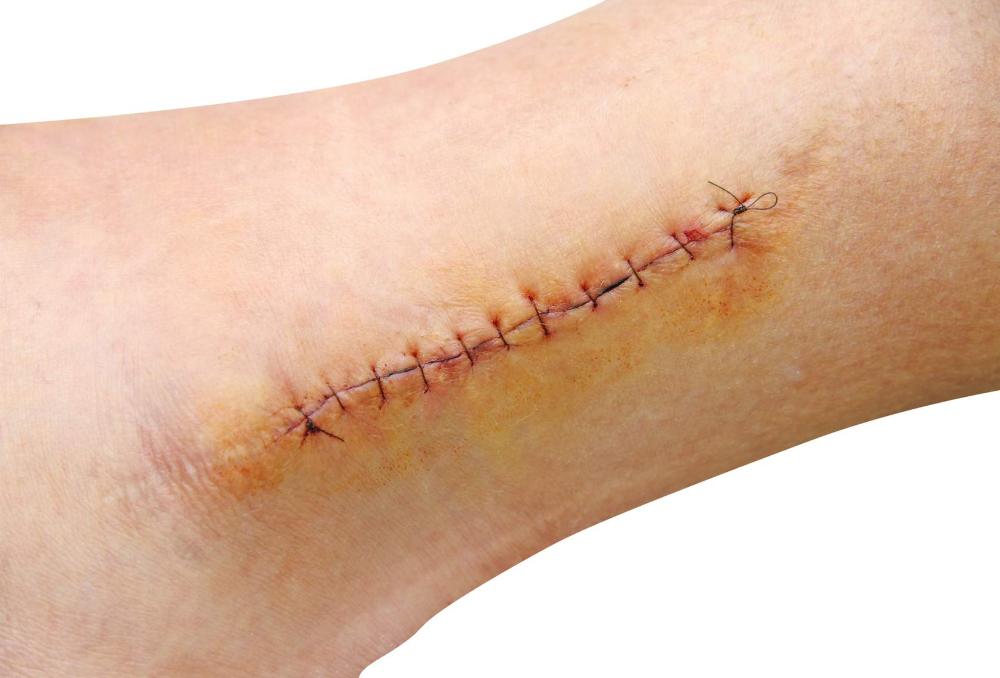
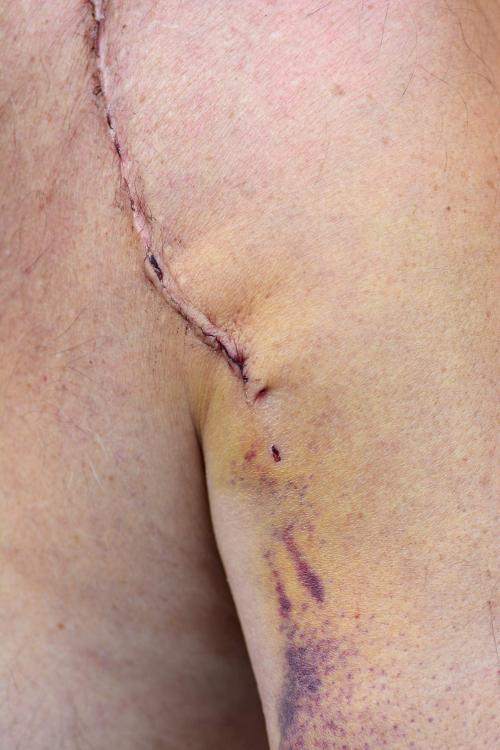
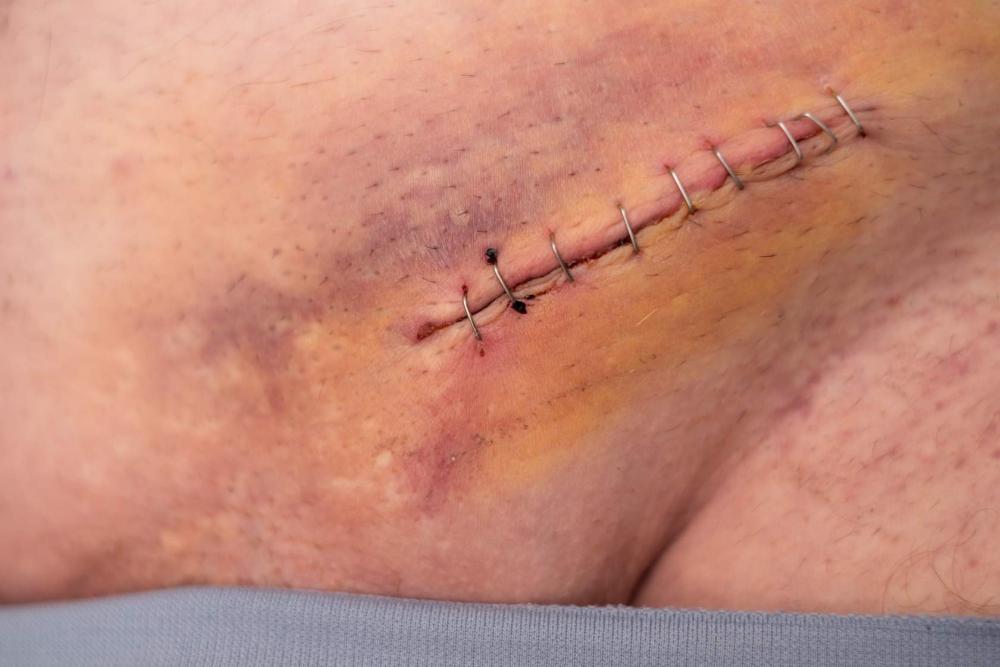
Primary Intention
With primary intention, the wound edges are brought together using mechanical means. This reduces the risk of infection, minimizes scarring, and promotes faster healing.
Examples of products used to reapproximate wounds include:
Staples, sutures, tissue adhesive, adhesive taspes (steri-strip)
Two types of sutures are absorbable and non-absorbable:
Absorbable
- Naturally degrade over time and do not require removal.
- Used for internal wounds or tissues requiring temporary support.
Two types of sutures are absorbable and non-absorbable:
Non-absorbable
- Manual removal is required once the wound has healed.
- Primarily used for skin closures and other external wounds.
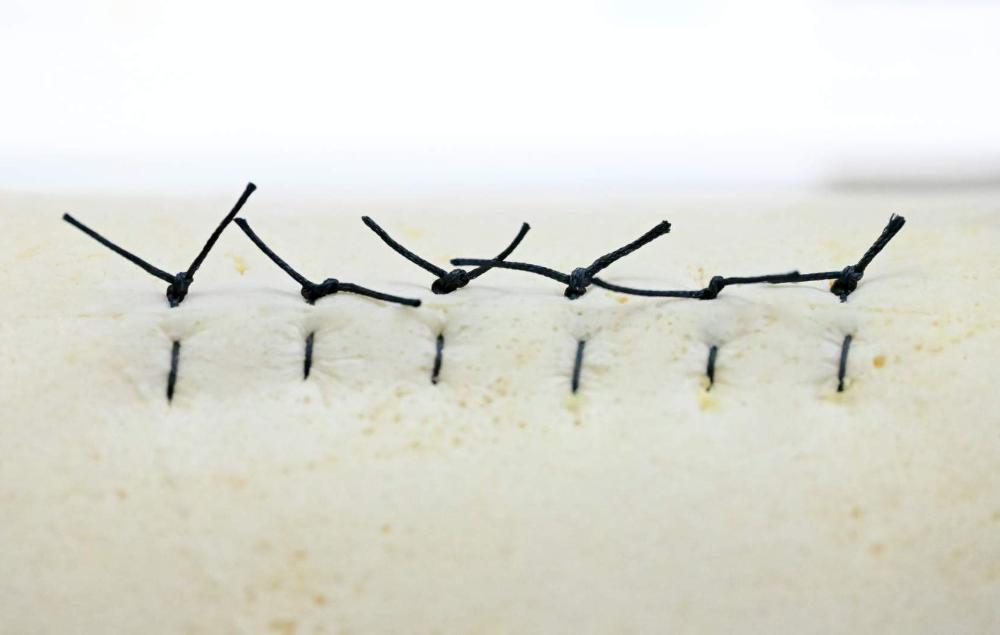
Interrupted Sutures
Each stitch is tied individually, providing added strength. If one stitch fails, the others remain intact.
Continuous Sutures
A single thread runs through the entire wound, offering a quicker closure but a higher risk of unraveling if one stitch breaks.
Subcutaneous Sutures
These are placed under the skin to minimize visible scarring, often using absorbable sutures.
Removal Tips
The timeframe for removal depends on the wound location and healing progress
...
Removal Tips
The timeframe for removal depends on the wound location and healing progress
...
Removal Tips
The timeframe for removal depends on the wound location and healing progress
...
Removal Tips
Lower extremities
8 to 10 days
Removal Tips
Digits, palm, plantar
10 to 14 days
Trunk, upper extremities
7 days
Scalp
7 to 10 days
Face, eyelids, neck
5 days
Suture removal tips include:
- Clean the suture line with antiseptic before removal.
- Use sterile instruments and proper technique.
- Loosen crusty debris with a surfactant-based wound cleanser.
- Remove every other stitch initially for interrupted patterns to avoid tension.
- Cut close to the skin on one side to prevent external contaminants from being pulled through.
- Apply adhesive strips to support the incision during the final healing stages.
- Document the number of removed sutures to ensure none are left behind.
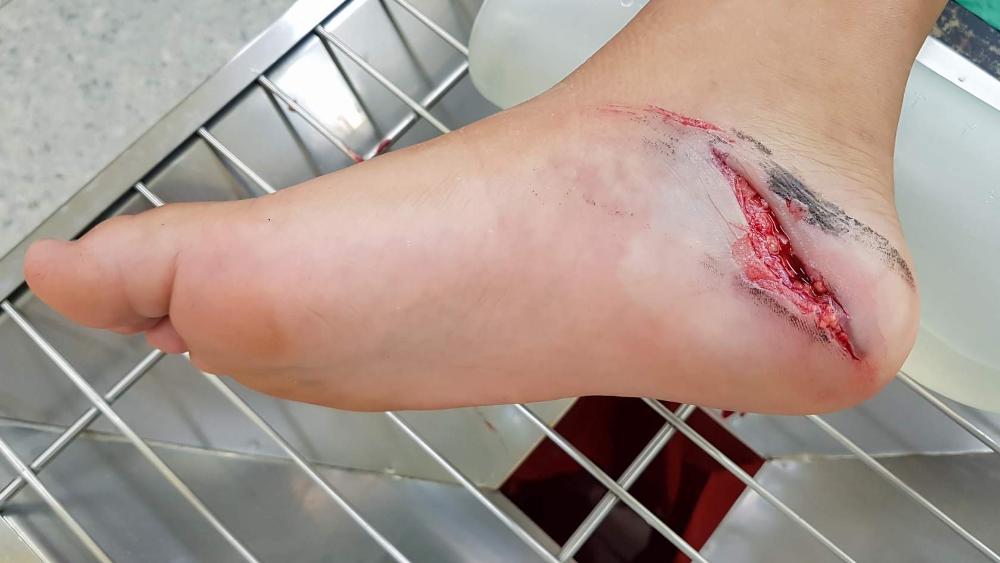
____ can trigger tissue reactions, and it is common to see some redness around the suture site, especially in the early stages of healing. Keeping the area clean and monitoring for any signs of infection is key to ensuring proper wound healing.
Sutures
In addition to the commonly used sutures for wound closure, retention sutures are designed for unique cases requiring enhanced stability. Retention sutures reduce tension on the wound edges, such as in abdominal layers. Regular nylon sutures are threaded through plastic or rubber tubing outside the incision.
Retention Sutures
Retention Sutures
- High-tension areas
- Patients with poor wound healing potential
- Cases of significant tissue loss
- Dehisced incisions
- Conditions that can cause increased intra-abdominal pressure (e.g., obesity, asthma, chronic cough)
Retention Sutures : Advantages
- Enhances wound stability
- Provides a second layer of protection
- Useful for high-risk patients with conditions that impair wound healing
Retention Sutures: Disadvantages
- Increased risk of infection
- Increased scarring
- Patient discomfort
- Complicated removal process
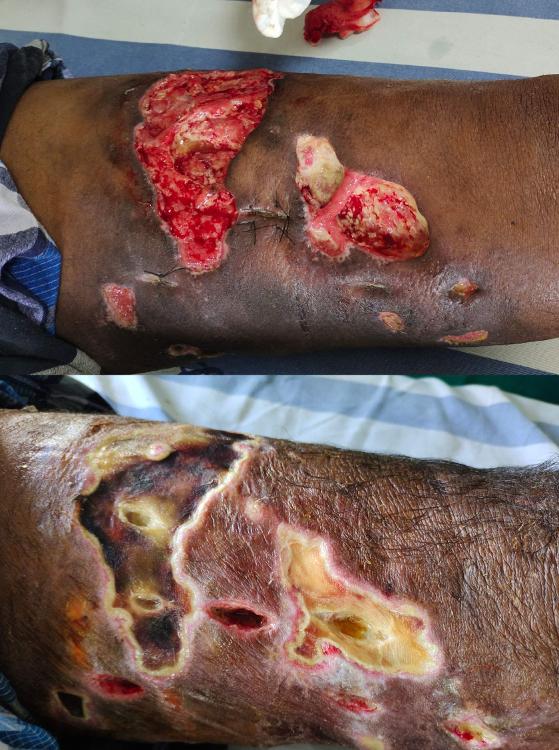
Retention Suture Removal
The timing for these type of suture removal depends on the wound location, the patient’s overall condition, and healing progress. Due to the complexity of the wounds, retention sutures are typically left in place 14 days or longer.
This type of suture should be removed only by the surgeon who placed it; the surgeon will remove multiple retention sutures in stages to avoid compromising wound integrity.
Tissue Adhesive
Tissue adhesives, or surgical glues, are medical-grade adhesives used to close minor wounds, cuts, and lacerations. These adhesives bond the wound edges, allowing the skin to heal naturally without traditional sutures or staples.
Tissue adhesives are best suited for:
- Simple, linear, low- tension lacerations.
- Superficial wounds on the face, trunk, or extremities.
- Pediatric lacerations to avoid needle-related anxiety.
Tissue Adhesive: Advantages
- Speed and Ease of Application: Reduces procedure time
- Patient Comfort: Usually painless
- No Suture Removal: Adhesive sloughs off naturally, avoiding follow-up for suture removal
- Water-Resistant Barrier: Provides a flexible, water-resistant protective coating
Tissue Adhesive: Disadvantages
- Limited to Low-Tension Wounds: Ineffective for high tension wounds or joints
- Infection Risks: May trap contaminants if applied improperly
- Adhesive Vulnerability: Prone to dislodgement with excessive moisture or movement
- Not Suitable for Hairy Areas: Does not adhere well to hairy areas
_____ _______ should not be used on jagged wounds, bites, or wounds deeper than 5mm.
Tissue adhesive
Aftercare
After the adhesive is applied to the wound, teach the patient and/or their caregiver the following (Bruns & Worthington, 2000):
- Keep the area dry for the first 24 hours, afterward gentle washing is okay, but avoid soaking (e.g., tub bath).
- Do not use ointments on the area as they may degrade the adhesive prematurely.
- Adhesives will naturally slough off; do not attempt to remove it.
- Monitor for signs of infection such as redness, warmth, or discharge and seek medical attention if they occur.
Acute wounds
_____ follow a predictable healing process, with epithelial resurfacing (2 to 3 days) restoring the skin barrier and collagen deposition (days 4 to 21) enhancing tensile strength and structural integrity. Appropriate management is key to avoiding complications.
Key factors influencing healing include-
aseptic techniques, managing comorbidities (e.g., diabetes), optimizing oxygenation, ensuring proper nutrition (e.g., vitamins C, A, E), and addressing psychological stress.
_____ closure techniques like sutures, staples, adhesive strips, and tissue adhesives have specific advantages and considerations for optimal healing based on wound type and location. The choice depends on wound type, tension, location, and expected cosmetic outcome.
Primary intention
- Respiratory
- Alimentary
- Genital
- Urinary tract
These areas are not entered and no breaks in sterile technique occurred during surgery. Examples of these types of wounds include hernia repair or mastectomies, and the risk of infection is low.
Class I or Clean
Clean surgical wounds are uninfected with no involvement of the following:
Class II or Clean-Contaminated
These are operative wounds where the respiratory, alimentary, genital, or urinary tracts are entered under controlled conditions without unusual contamination or breaks in sterile technique. Gastrointestinal surgeries such as appendectomy or cholecystectomy are examples of clean-contaminated wounds.
Class III or Contaminated
Class III or contaminated wounds are open, fresh traumatic wounds (e.g., soft tissue lacerations, open fractures, and penetrating wounds) and operative procedures in which gross spillage from the GI tract occurs, or a major break in sterile technique occurs. Rapid growth of pathogens can result in an infected wound within 6 hours.
Class IV or Dirty Infected
These are old traumatic wounds that have retained devitalized tissue, wounds involving existing clinical infection or perforated viscera, and wounds that suggest that the pathogens were present in the operative field before the operation. Surgeries on perforated bowels or with abscess drainage fall into this category.
A 55-year-old male patient has undergone abdominal surgery and is on
post-op day 7. During the wound assessment, you notice that the
patient does not have a palpable healing ridge along the incision
line.
What is your most appropriate next action?
Reassess the patient’s healing status and investigate for signs of infection or dehiscence.
Type 1 Skin tear
No skin loss, indicating the linear or flap tear can be repositioned to cover the wound bed.
Type 2 Skin tear
Partial skin loss, indicating partial flap loss that cannot be repositioned to cover the wound bed.
Type 3 Skin tear
Total flap loss, indicating total exposure of the wound bed due to total flap loss.
Individuals with dry, fragile skin or a previous history of skin tears are at risk for this type of acute wound. Other risk factors include:
- Advanced age
- Medications that affect the skin
- Impaired mobility or vision
- Cognitive or sensory impairment
- Comorbidities such as heart disease or diabetes
- Poor nutrition
- Dehydration
TRUE / FALSE
Skin tears not treated immediately lead to complications such as pain, infection, and delayed wound healing.
True
Treatment
The initial step is to assess the wound to determine the type of skin tear. Then, gently cleanse with normal saline or surfactant-based cleanser if there is debris or dried blood. Steps for approximating the skin flap include:
- Use normal saline to gently cleanse the skin tear.
- Allow the area to air dry or pat dry carefully with gauze.
- Use a saline-moistened, cotton-tipped applicator or sterile forceps to approximate the skin tear flap.
- Apply a petroleum-based ointment, Steri-strips™, or a moist non-adherent wound dressing.
- Be careful with the use of film dressings as they can cause further injury to the skin during removal.
- Put an arrow on the dressing in the direction of the skin tear to prevent further injury during removal (Davis, 2018).
- Document assessment findings and the associated treatment.
- Use skin sealants, petroleum-based products, and other water-resistant products (e.g., protective barrier ointments or liquid barriers) to protect the peri-wound area from excess exudate moisture and from trauma during dressing removal.
___ wounds from animal bites are prone to infection. Suturing can trap bacteria, so leaving the wound open allows it to drain and reduces infection risk. Keeping the wound moist, avoiding damage to nearby structures, and reducing scarring are not the primary reasons for avoiding suturing.
Puncture
Rule of NINES
The Rule of nines is a commonly used method for calculating TBSA in adults with burn injuries. It is only used for partial and full-thickness burns:
Entire (Front and Back)
Head and Neck
9
Right Arm
9
Left Arm
9
Trunk
36
Genitals
1
Right leg
18
Left leg
18
Rule of NINES
The Rule of nines is a commonly used method for calculating TBSA in adults with burn injuries. It is only used for partial and full-thickness burns:
Anterior/Posterior Only
TBSA Percentage
Head and Neck
4.5
Right Arm
4.5
Left Arm
4.5
Trunk
18
Genitals
1
Right leg
9
Left leg
9
Rule of Nines further division
Head and neck 9%
Upper limbs 9%
Trunk 36%
Genitalia 1%
Lower Limbs 18%
Regions can be divided further; for example, if only the front of the chest is injured on the trunk, this would be 9% TBSA.
Adjustments are made based on proportions for pediatric patients. For example, infants have proportionally larger heads and smaller legs: PEDs
Entire (Front and Back)
TBSA Percentage
Head and Neck
18
Right Arm
9
Left Arm
9
Trunk
36
Right leg
14
Left leg
14
Adjustments are made based on proportions for pediatric patients. For example, infants have proportionally larger heads and smaller legs: PEDs
Anterior/Posterior Only
TBSA Percentage
9
Right Arm
4.5
Left Arm
4.5
Trunk
18
Right leg
7
Left leg
7
Classifications
Previously, burns were categorized by degrees of injury, with a first-degree burn being mild and superficial and a fourth-degree burn being the worst. This classification has been updated to describe the depth of the injury for better clarity.
Burns are classified by depth, size, and location to guide treatment and predict outcomes. The table below summarizes the key characteristics and appropriate treatments for each burn type. See the next few card set for details.
Classifications
Previously, burns were categorized by degrees of injury, with a first-degree burn being mild and superficial and a fourth-degree burn being the worst. This classification has been updated to describe the depth of the injury for better clarity.
...
Classifications
Previously, burns were categorized by degrees of injury, with a first-degree burn being mild and superficial and a fourth-degree burn being the worst. This classification has been updated to describe the depth of the injury for better clarity.
...
Classifications
Previously, burns were categorized by degrees of injury, with a first-degree burn being mild and superficial and a fourth-degree burn being the worst. This classification has been updated to describe the depth of the injury for better clarity.
Previously, burns were categorized by degrees of injury, with a first-degree burn being mild and superficial and a fourth-degree burn being the worst. This classification has been updated to describe the depth of the injury for better clarity.
Classifications - Superficial
*Only burn type not included in TBSA calculations
Previously, burns were categorized by degrees of injury, with a first-degree burn being mild and superficial and a fourth-degree burn being the worst. This classification has been updated to describe the depth of the injury for better clarity.
Description : Involves only the epidermis
Characteristics: Blanches easily, dry, red and can be painful
Treatment:
- Cool water over the burn, avoid ice and apply aloe vera to prevent sunburn. It heals in 3 to 6 days.
Classifications - Superficial Partial-Thickness
Previously, burns were categorized by degrees of injury, with a first-degree burn being mild and superficial and a fourth-degree burn being the worst. This classification has been updated to describe the depth of the injury for better clarity.
*Only burn type not included in TBSA calculations-
Description : Extends through the epidermis into the upper layers of the dermis
Characteristics:
- Moist, red, blanching, blisters
- Edema
- Severe pain
Treatment:
- Cool water, sterile dressings, pain management
- Monitor for air movement and temperature sensitivity
Classifications - Deep Partial-Thickness
Previously, burns were categorized by degrees of injury, with a first-degree burn being mild and superficial and a fourth-degree burn being the worst. This classification has been updated to describe the depth of the injury for better clarity.
*Only burn type not included in TBSA calculations-
Description : Damages deeper layers of the dermis, not the full thickness of the skin
Characteristics:
- Drier, paler
- Less blanching
- Less pain
- Splotchy red areas,
- Waxy or white patches
Treatment:
- Focus on airway, breathing, circulation (ABC)
- Sterile dressings
- Extremity elevation
- Maintain body temperature
Classifications - Full-Thickness
Previously, burns were categorized by degrees of injury, with a first-degree burn being mild and superficial and a fourth-degree burn being the worst. This classification has been updated to describe the depth of the injury for better clarity.
*Only burn type not included in TBSA calculations-
Description : Destroys all skin layers and extends into muscles, tendons, and deeper tissues
Characteristics:
- Dry, leathery texture
- Variable colors (white, black, brown)
- Loss of sensation due to nerve damage
Treatment:
- ABCs
- Fluid resuscitation
- Escharotomy
- Surgical intervention
- Long-term care