Instructions for Side by Side Printing
- Print the notecards
- Fold each page in half along the solid vertical line
- Cut out the notecards by cutting along each horizontal dotted line
- Optional: Glue, tape or staple the ends of each notecard together
Parts of the Microscope
front 1  | back 1 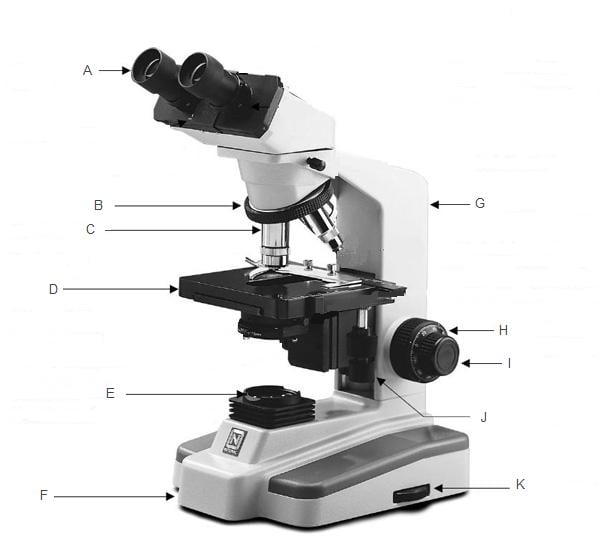 |
front 2 eyepiece | back 2 The lens at the top that you look through; they are usually 10X or 15X power. |
front 3 interpupillary scale | back 3 When using a stereo or binocular microscope there must be an adjustment for the distance between the viewers eyes. A young child will have a small interpupiliary distance and an adult a larger one. The eyepiece lenses will spread apart or get closer together to fit each individual. This should be the first adjustment to make so that you are comfortably viewing the specimen with both eyes. |
front 4 revolving nosepiece | back 4 The part of the microscope that holds the objective lenses also called a turret. |
front 5 stage | back 5 The flat plate where the slides are placed for observation. |
front 6 condensor lens | back 6 A lens mounted in or below the stage whose purpose is to focus or condense the light onto the specimen. The higher power objective lenses have very tiny diameters and require concentrated light to work properly. By using a condenser lens you will increase the Illumination and resolution. Condenser lenses are not required on low power microscopes. |
front 7 head | back 7 The upper part of the microscope that contains the eyepiece tube and prisms. A monocular head has one eyepiece, a binocular has two (one for each eye), a dual head has two but they are not together, and a trinocular head has three, one which is generally used for a camera connection. |
front 8 arm | back 8 The part of the microscope that connects the tube to the base. When carrying a microscope, grab the arm with one hand and place your other hand under the base. |
front 9 coarse focus knob | back 9 This is the rough focus knob on the microscope. You use it to move the objective lenses toward or away from the specimen (see fine focus). |
front 10 fine focus knob | back 10 This is the knob used to fine tune the focus on the specimen. It is also used to focus on various parts of the specimen. Generally one uses the coarse focus first to get close then moves to the fine focus knob for fine tuning. |
front 11 illumination | back 11 A light source mounted under the stage. Three types of light are commonly used: Tungsten, Fluorescent and Halogen. Tungsten is the least expensive and most common. Fluorescent is bright, white and runs cool and Halogen is very bright and white but gives off heat like tungsten. |
front 12 base | back 12 The bottom support of the microscope. |
front 13 diaphragm/iris | back 13 Many microscopes have a rotating disk under the stage. This diaphragm has different sized holes and is used to vary the intensity and size of the cone of light that is projected upward into the slide. There is no set rule regarding which setting to use for a particular power. Rather, the setting is a function of the transparency of the specimen, the degree of contrast you desire and the particular objective lens in use. |