Instructions for Side by Side Printing
- Print the notecards
- Fold each page in half along the solid vertical line
- Cut out the notecards by cutting along each horizontal dotted line
- Optional: Glue, tape or staple the ends of each notecard together
Exam 1 photography
front 1 the amount of light that reaches your camera’s sensor, creating visual data over a period of time | back 1 Exposure |
front 2 change that either halves or doubles the overall lighting from the original exposure | back 2 exposure stops |
front 3 the distance between the nearest and furthest objects that are in acceptability sharp focus in an image captured with a camera | back 3 Depth of Field: |
front 4 a camera setting that measure how sensitive the camera’s imaging sensor is to light | back 4 ISO |
front 5 describes how the intensity of light changes as you move away from the source of light
| back 5 Inverse square law: |
front 6
| back 6 Exposure Variables: |
front 7 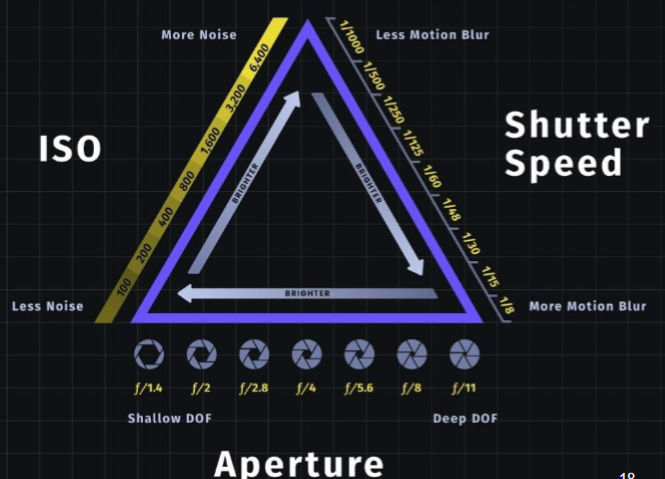 | back 7 Reciprocity Between F-Stops, Shutter Speeds, and ISO “Normal” Lens: |
front 8 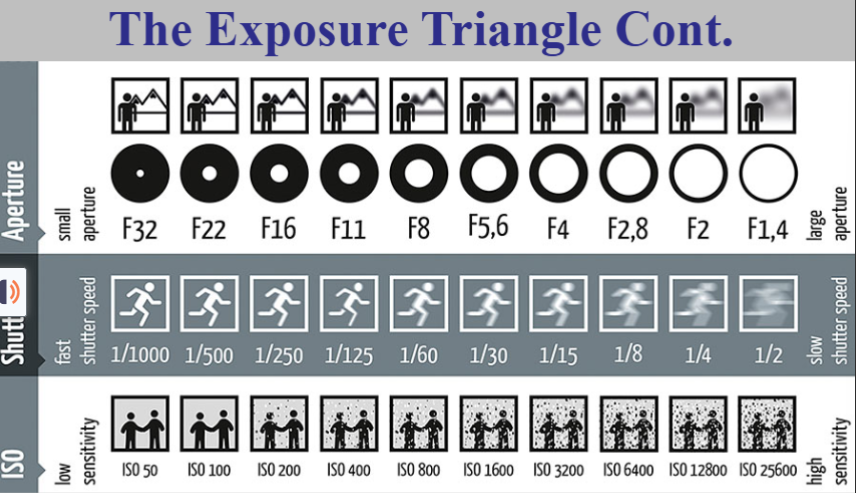
| back 8 Exposure triangle |
front 9
| back 9 18% grey card: |
front 10 this is how long the shutter of your camera stays open | back 10 shutter speed |
front 11
| back 11 3 types of movement mitigated by shutter speed: |
front 12
| back 12 stopping motion |
front 13 - utilize camera strap -protect camera from harsh elements - use storage/carrying case to protect camera and equipment - store camera in well ventilated, cool, dry area | back 13 camer care |
front 14 -Protection of the lens - reduction of haze -warming | back 14 UV filter |
front 15 -reduction of glare and reflection - enhancement of color | back 15 Polarizing filter |
front 16 - normal lenses focal length for the sensor format yields the most accurate reproduction of reality - use wide angle and telephoto focal lengths only when absolutely necessary | back 16 Perpective |
front 17 uses a mirror and prism system to allow the photographer to see through the lens | back 17 single lens reflex (SLR) |
front 18 a digital version of the SLR, using a digital sensor to capture the image | back 18 digital single lens reflex |
front 19 does not have a mirror and uses an electronic viewfinder to display image | back 19 digital single-lens mirrorless (DSLM) and mirrorless interchangeable lens camera (MILC) |
front 20  | back 20 camera nomenclature |
front 21 - A tool the brain uses to experience the world around it | back 21 vision |
front 22 - the process of becoming aware of the representation of an object or scene - people accept photographs as reasonably accurate representations of objects and scenes, because we expect them to | back 22 perception |
front 23 - Deviations from normal focal length may produce images with distorted perspective - Linear perspective is a visual clue that creates the illusion of space and distance on a flat surface - parallel lines that appear to converge | back 23 vanishing point |
front 24 Kodak’s 10 Tips for taking better photo | back 24 - get down on the subjects -use a plain background -using the flash outdoors -move in close - take some vertical photos - lock the focus - move it from the middle - know the flashs range - watch light - be a picture director |
front 25 a technique to reduce the intensity of shadows and allows for details of the subject to be visible and well-balanced | back 25 fill flash |
front 26 -when the object is fully in a photograph | back 26 filling the frame |
front 27 -the data they record is the light intensity for each individual pixels on the imaging chips - stored as a bunch of ones and zeros strung together in a binary code - must convert raw files to JPEG or TiFF | back 27 RAW images |
front 28 -removes some originally recorded information from the images - are processed inside the camera itself | back 28 Lossy (JPEG) |
front 29 -raw files are processed by the computer once you import the file - can be used by examiners to make comparisons between known and unknown pieces of evidence | back 29 Lossless |
front 30 -Fingerprints, footwear, tire marks, or any other impression evidence - Bloodstain documentation - bullet strikes and impacts - tool marks - reconstruction photographs -bite marks | back 30 Examples of comparison/analysis photographs |
front 31 - some types of evidence have a standard to follow when photographing - This is to maximize the image quality - fingerprints need to be photographed with a 1000 ppi ratio - footwear and tire mark impressions need to be photographed with a 500 ppi ratio | back 31 pixels-per-inch (ppi) ratio |
front 32 - need to know the size of your imaging chip - divide the horizontal and vertical pixels by 1000 - the results is the max image capture size in inches - you msut then convert the inches to millimeters | back 32 How to determine ppi? |
front 33 mosaic patter of color, color filter array (CFA) | back 33 positioned on top of the sensor to filter out the red, green, and blue components of light falling onto it |
front 34 examination quality photos | back 34 correlates with having an ISO of 100 |
front 35 number is the focal length of the lens divded by the diameter of the opening | back 35 f-stop |
front 36 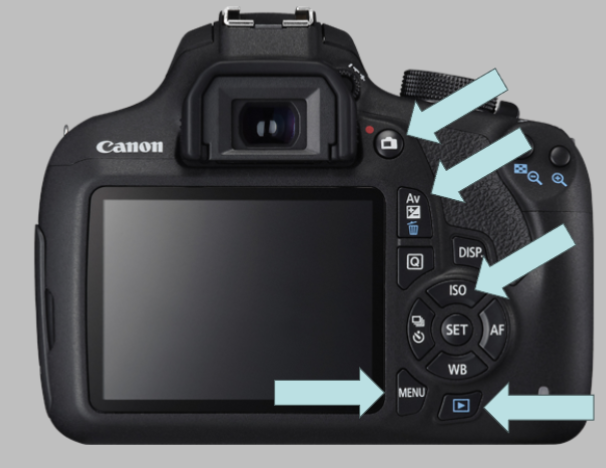 name from top to bottom | back 36 1. to digitally see the image 2. change the apeture settings (f-stop and shutter) 3. how much light hits sensor 4. menu 5. to look at images |
front 37 a process used to estimate the color of missing pixels in an image and can affect image quality by introducing artifacts or reducing sharpness | back 37 interpolation |
front 38 the distance between the lens and the image sensor when the lens is focus at infinity | back 38 focal length |
front 39 - images that are free for public use - non-copyrighted images - many free and public websites have collections of public images for individuals to use without copyright, permissions, and citation issues | back 39 Public images |
front 40 1. Complete an application form 2. pay a filing fee 3. submit a copy of the work you want to register | back 40 how to file a copyright |
front 41 A group of rights over an artistic work that gives the copyright owner the exclusive right to display, sell, amke, distribute the work or create adaptations based upon the original work. - includes records, books, poems, plays, paintings, photographs, and more | back 41 copyright |
front 42 - involves the transformation or alteration of a photograph - Depending on the motive behind manipulating a photograph, it can be seen as a skillful artwork or an unethical practice | back 42 doctored image |
front 43 how can we tell if an image is altered? | back 43
|
front 44 - free website and tools for digital image analysis - has tools such as : error level analysis, meta data extraction, detection, JPEG quality and more | back 44 forensically (analysis tools for public use) |
front 45 - free platform that gives access to valuable tools used in digital forensic analysis - have similar tools and functions as listed above | back 45 FotoForensics (analysis tools for public use) |
front 46 - established in 2008, Italian based company - company and teams comprised of experienced forensic photo and video experts - offers analysis services but also educational clinics and programs to help other agencies learn and develop their digital forensic analysis | back 46 Amped Software |
front 47 - create or enhance contrast through fluorescence - light/energy below 400 nm | back 47 UV photography |
front 48 - forgery and document alterations - fibers and other trace evidence - semen,, blood, and other bodily fluids - bruises or bite marks -gunpowder residue - fingerprint enhancements | back 48 UV light applications |
front 49 What are the stages of bruises? | back 49 red ( 0-2 days), blue (2-3 days), green (5-7 days), yellow (7-10 days), brown (10-14 days) |
front 50 - applying light of 700 nm or higher to evidence - directly apply the light to the evidence or reflect the light, but filters will be needed to block all visible light from entering the camera and only view the _ light | back 50 IR photography |
front 51 - enhancement of tattoos - document examinations and forgery investigations - gunshot residue - bloodstain evidence | back 51 IR light applications |